Making Christmas gifts for a favorite stuffy - tutorial and patterns
My son has a favorite stuffy - he is a pig-bear named Heart. Kieran never liked stuffies until he came across Heart at his grandparent's place last year and just fell in love with him.
Heart has a sweet little heart appliqued on him and a raggy little scarf. Heart was once left behind at my friend's house and she sent him home with a handmade quilt with a heart on it.
I thought perhaps Heart would like to have a Christmas gift this year and it would be an awesome surprise for my little guy. So I made him a stocking and filled it with some things for him to wear.
On one side, I sewed a white square of the soft side of velcro in the middle for the gauze part and two small pieces of black velcro, one on each end, to adhere the bandaid to his fur.

Then I added another rectangle of brown felt on the back to cover all the stitching.

I found a piece of fleece-like fabric with an animal print as I thought it would match his wild side.
Download this pattern and adjust as needed. Heart is 12" tall.
Vest pattern
To make your own pattern, lay your stuffy down and mark the shoulders, where the arm joint is, and also the length you want it to be. Then use the pattern here for the general idea of the shape of the pieces. The front pieces should be similar to the back piece, but with more than half the width.
Cut out your pieces - one back and the front piece cut twice.

Add seam allowance where needed - if you are not finishing your edges, you only need a seam allowance on the shoulder seams and the side seams. You don't need a large seam allowance - 1/4" or so should do.

You may also wish to add a hem on the front edges for strength and to look a bit nicer.

Once you have your pattern - check it against your stuffy. Heart had a bit of a belly, so I added a bit to the front pattern piece in the centre.


Sew the shoulder seams first.
Then sew the side seams.

Sew a hem on the front inside edges if you like.
If you want a button, check fit on the stuffy first, then figure out where the button should go. I used one wooden button and the buttonhole foot for my machine to make it nice.

Trim the corners of the seam allowances so they don't show through.

Use this pattern here if you have a stuffy about Heart's size. It includes the pattern for the mask - the tutorial for that is further down.
Pattern for Cape and Mask
Cut out one layer if using fleece or felt, or two layers of other fabrics.
If using one layer - skip ahead to section on the neck.
If using two layers, add a seam allowance on all sides of the pattern.

Sew the two layers together, right sides together and leave a space for turning.
I added piping on the bottom for a bit of structure and flare, this is totally optional. If attaching piping, put the piping part on the inside between the layers and use your piping/zipper foot to sew it in - sew as close as you can to the bulky part of the piping.


Turn it right side out and topstitch, closing up the hole for turning.
Sew it on to the top of the cape, starting part way into the cape, and attach the end overlapping the beginning on the cape.

For a pattern that fits a stuffy the size of Heart, use the pattern for the Cape and Mask.
To create your own pattern, measure first with a rectangular piece of felt over the face to see how wide and tall it should be. Transfer your measurements to paper, making a rectangle.

Measure from the center of one eye to the centre of the other eye. It is 3 cm between Heart's eyes - that's just over an inch.

Measure the center point of your rectangle and mark it. Then measure half of your eye measurement from the centre to each side and mark, almost half way down the rectangle.
 Draw eye holes with the eye marks in the centre. Add a dip in the centre of the top of the mask. Add a bigger dip in the centre of the bottom and curve down and out towards the outside of the mask.

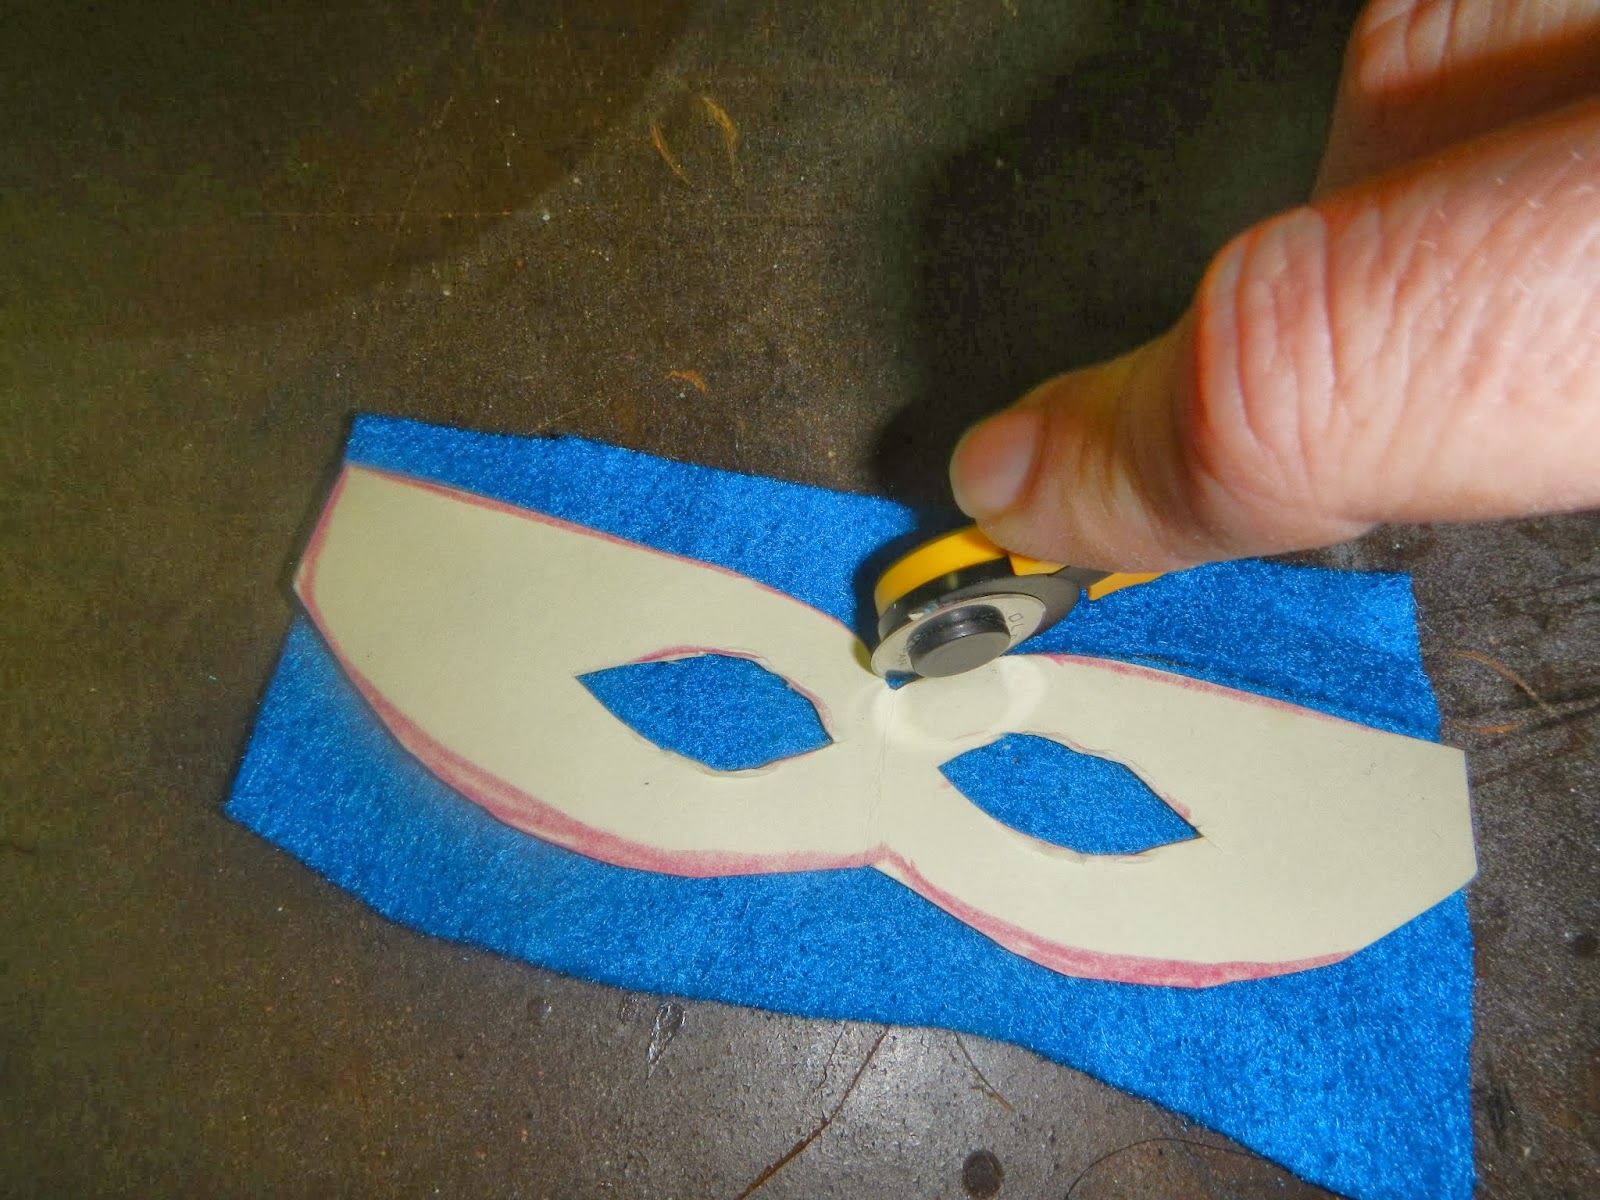
Copy to your fabric and cut it out - a tiny rotary cutter is handy for this.

Clean up the edges of your cuts.
Place the mask on the stuffy and measure how much elastic you will need to go around the head - make it that size or a bit smaller.
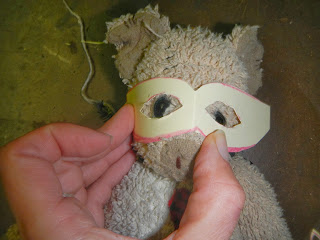
Sew on the elastic at the sides of the mask. Try it on to make sure it is a bit tight and won't fall off.

If you would like to buy a superhero set for your child's stuffy (or your own stuffy, I don't judge), please see my Etsy listings.
custom teddy costume on Etsy
Heart tried on all of his new duds - he promised to forget by Christmas so he would be surprised when he saw them again.


Heart has a sweet little heart appliqued on him and a raggy little scarf. Heart was once left behind at my friend's house and she sent him home with a handmade quilt with a heart on it.
I thought perhaps Heart would like to have a Christmas gift this year and it would be an awesome surprise for my little guy. So I made him a stocking and filled it with some things for him to wear.
Bandaid
Heart has many adventures. Perhaps some may turn out a bit rough so I made a bandaid with a rectangle of brown felt.
On one side, I sewed a white square of the soft side of velcro in the middle for the gauze part and two small pieces of black velcro, one on each end, to adhere the bandaid to his fur.

Then I added another rectangle of brown felt on the back to cover all the stitching.

Vest
I thought Heart could use some clothes and designed a simple but snazzy vest for him. For this vest, it is best to use a non-fraying fabric like felt or fleece. Otherwise, cut two of each piece so there is a lining.
I found a piece of fleece-like fabric with an animal print as I thought it would match his wild side.
Download this pattern and adjust as needed. Heart is 12" tall.
Vest pattern
To make your own pattern, lay your stuffy down and mark the shoulders, where the arm joint is, and also the length you want it to be. Then use the pattern here for the general idea of the shape of the pieces. The front pieces should be similar to the back piece, but with more than half the width.
Cut out your pieces - one back and the front piece cut twice.

Add seam allowance where needed - if you are not finishing your edges, you only need a seam allowance on the shoulder seams and the side seams. You don't need a large seam allowance - 1/4" or so should do.

You may also wish to add a hem on the front edges for strength and to look a bit nicer.

Once you have your pattern - check it against your stuffy. Heart had a bit of a belly, so I added a bit to the front pattern piece in the centre.


Sew the shoulder seams first.
Then sew the side seams.

Sew a hem on the front inside edges if you like.
If you want a button, check fit on the stuffy first, then figure out where the button should go. I used one wooden button and the buttonhole foot for my machine to make it nice.

Trim the corners of the seam allowances so they don't show through.
Superhero Cape
This one is nice and easy to make. Measure your stuffy and mark off just past the edges of the shoulders and outwards past the hips (further if you want a wider cape) and as long as you like - usually to about the hips.

Use this pattern here if you have a stuffy about Heart's size. It includes the pattern for the mask - the tutorial for that is further down.
Pattern for Cape and Mask
Cut out one layer if using fleece or felt, or two layers of other fabrics.
If using one layer - skip ahead to section on the neck.
If using two layers, add a seam allowance on all sides of the pattern.

Sew the two layers together, right sides together and leave a space for turning.
I added piping on the bottom for a bit of structure and flare, this is totally optional. If attaching piping, put the piping part on the inside between the layers and use your piping/zipper foot to sew it in - sew as close as you can to the bulky part of the piping.


Turn it right side out and topstitch, closing up the hole for turning.
Neck
To attach it to the teddy, it's easiest to use an elastic. Cut elastic that is just a bit bigger around than the stuffy's neck, but make sure it can stretch to the widest diameter of the head.Sew it on to the top of the cape, starting part way into the cape, and attach the end overlapping the beginning on the cape.

Superhero Mask
It's easiest to use felt for the mask.
For a pattern that fits a stuffy the size of Heart, use the pattern for the Cape and Mask.
To create your own pattern, measure first with a rectangular piece of felt over the face to see how wide and tall it should be. Transfer your measurements to paper, making a rectangle.

Measure from the center of one eye to the centre of the other eye. It is 3 cm between Heart's eyes - that's just over an inch.

Measure the center point of your rectangle and mark it. Then measure half of your eye measurement from the centre to each side and mark, almost half way down the rectangle.


Copy to your fabric and cut it out - a tiny rotary cutter is handy for this.
Clean up the edges of your cuts.
Place the mask on the stuffy and measure how much elastic you will need to go around the head - make it that size or a bit smaller.

Sew on the elastic at the sides of the mask. Try it on to make sure it is a bit tight and won't fall off.
Stocking
To make a stocking, just cut out a stocking shape freehand on two layers of felt or fleece. Embellish as desired - I added a heart to make it obvious whose stocking it is. Sew together and turn. Add two pieces of ribbon or a loop of ribbon to hang - depending on your setup.

If you would like to buy a superhero set for your child's stuffy (or your own stuffy, I don't judge), please see my Etsy listings.
custom teddy costume on Etsy
Heart tried on all of his new duds - he promised to forget by Christmas so he would be surprised when he saw them again.


Comments
Post a Comment